| ホーム > Java言語で学ぶデザインパターン入門 > デザインパターン紹介 | 検索 | 更新情報 |
|
|
|
別ページで紹介しているもの
こんにちは。結城浩です。
結城が書いた 『Java言語で学ぶデザインパターン入門』では、GoFによる23個のデザインパターンをご紹介しました。 けれども、デザインパターンは23個ですべてではありません。 このページでは、 GoF以外のデザインパターンをいくつかご紹介します。
あえてカタログ形式にはこだわらず、 簡単な紹介文と、サンプルプログラム、それに参考URLなどを示します。 そのパターンがどんなものであるかをサクッと理解するための記述にとどめ、 利用に関する議論などは省略してあります。
このページをお読みになって「デザインパターン」に興味を持たれた方は、 ぜひデザインパターン・メーリングリストにご参加ください。 このページに書く内容は、 不定期にデザインパターン・メーリングリストにも投稿する予定です。
結城がデザインパターン・メーリングリストに投稿した紹介文とプログラムに関して、 助田雅紀さんからRubyに関するコメントを多数いただきました。 助田さんは『Rubyを256倍使うための本 極道編』の著者です。 ここに感謝します。
以下はおまけです。 GoFのパターンを、ちょっぴり毒のある猫の対話で紹介しています。
Abstract Class(アブストラクト・クラス)パターンのお話をします。 これは非常に基本的なパターンであり、 一言で言えば「抽象クラスって何のためにあるの?」という問いに答えるパターンです。
さっそくサンプルプログラムを見てみましょう。 まずは、Abstract Classパターンを使っていない例です。
以下では、MusicPlayerとVideoPlayerという2つの「プレイヤー」のクラスがあります。 このクラスたちは同じメソッド群を持っていますが、 互いに関連付けられていません。 Mainクラスはそれぞれのプレイヤーを使っていますが、 両者を取りまとめることはできません。
class MusicPlayer {
    public void load(String title) { /* load the music */ }
    public void play() { /* play the music */ }
    public void pause() { /* pause playing */ }
    public void stop() { /* stop it */ }
}

class VideoPlayer {
    public void load(String title) { /* load the video */ }
    public void play() { /* play the video */ }
    public void pause() { /* pause playing */ }
    public void stop() { /* stop it */ }
}

class Main {
    public static void main(String[] args) {
        MusicPlayer mplay = new MusicPlayer();
        mplay.load("bach.mid");
        mplay.play();

        VideoPlayer vplay = new VideoPlayer();
        vplay.load("mi2.avi");
        vplay.play();
    }
}
では、Abstract Classパターンを使った例をお見せしましょう。
今度は抽象クラスPlayerを作ります。 そして、共通なメソッド群を抽象メソッドとして宣言します。 MusicPlayerとVideoPlayerは共通の親クラス(基底クラス、スーパークラス)として、 Playerクラスを持つことにします(extends Playerの部分に注目)。
上の例と比べてみてください。
abstract class Player {
    public abstract void load(String title);
    public abstract void play();
    public abstract void pause();
    public abstract void stop();
}

class MusicPlayer extends Player {
    public void load(String title) { /* load the music */ }
    public void play() { /* play the music */ }
    public void pause() { /* pause playing */ }
    public void stop() { /* stop it */ }
}

class VideoPlayer extends Player {
    public void load(String title) { /* load the video */ }
    public void play() { /* play the video */ }
    public void pause() { /* pause playing */ }
    public void stop() { /* stop it */ }
}

class Main {
    public static void main(String[] args) {
        Player mplay = new MusicPlayer();
        mplay.load("bach.mid");
        mplay.play();

        Player vplay = new VideoPlayer();
        vplay.load("mi2.avi");
        vplay.play();

        Player[] player = { mplay, vplay };
        for (int i = 0; i < player.length; i++) {
            player[i].stop();
        }
    }
}
さらに、Mainクラスを見てください。 ここでは、MusicPlayerのインスタンスmplayとVideoPlayerのインスタンスvplayをあわせて、 1つのPlayerの配列に押し込んでいます。 そしてforループで回してstopメソッドを呼び出しています。 この部分、player[i]に格納されているのがどのクラスのインスタンスなのかを 調べていないことに注目してください。 これは、ポリモルフィズムの典型的な例です。 これができるのは、Playerという共通の親クラスがあるからです。
Abstract Classパターンを使わないと、MusicPlayerとVideoPlayerはばらばらでした。 でも、Playerという抽象クラス(abstract class)を導入することで、 ばらばらだったMusicPlayerとVideoPlayerがまとまり、 1つの「型(type)」を作ったことになるのです。
この例では、使っていませんが、 Abstract Classパターンは、 しばしばTemplate Methodパターンと共に使われます。
Javaは単一継承なので、 うまく抽象クラスを使ったクラス階層ができない場合が たびたびあります。 その場合には、 Javaのinterfaceの機能を使うことになるでしょう。
Abstract Classパターンについて詳しく知りたい場合には、 以下のページをごらんください。
上記ページによれば、 Abstact Classパターンは、
などとも呼ばれています。
以下は助田雅紀さんによる、 Abstract ClassパターンとRubyに関するコメントです。
Rubyでは、同じメソッド群を持っていれば、それらを取りまとめて扱うことができます。

Rubyでは、Abstract Classパターンを使わなくてもポリモルフィズムが実現できてしまいます。
同じインターフェースをもつメソッドを定義しておけば、それで十分です。

しかし、デメリットもあります。
ソースを見ても、どのメソッドを定義しておけば取りまとめて扱うことができるのか、
すぐにわからないことです。
例えば、新たにDVDPlayerを追加して、
MusicPlayerとVideoPlayerと一緒にまとめてしまいたいときを考えてみます。
Javaでは、Playerクラスを継承して、Player クラス(Abstract Class)に
あるメソッド群を定義すれば良いとわかります。
ですが、Rubyでは、Playerクラスに相当するものが無いため、
すぐにどのメソッドを定義しておけば良いのかわかりません。
ドキュメントに明記しておくなどの何らかの対策が必要です。

Rubyも単一継承なので、うまく抽象クラスを使ったクラス階層ができない場合には、
moduleの機能を使うことになると思います。

助田 雅紀
class MusicPlayer
  def load(title)
    # load the music
  end
  def play
    # play the music
  end
  def pause
    # pause playing
  end
  def stop
    # stop it
  end
end

class VideoPlayer
  def load(title)
    # load the music
  end
  def play
    # play the music
  end
  def pause
    # pause playing
  end
  def stop
    # stop it
  end
end

class Main
  def Main.main
    mplay = MusicPlayer.new
    mplay.load("bach.mid")
    mplay.play
    vplay = VideoPlayer.new
    vplay.load("mi2.avi")
    vplay.play

    player = [mplay, vplay]
    player.each do |play|
      play.stop
    end
  end
end
Balking(ボーキング)パターンについてお話します。
balk(ボーク)というのは、 「急に止まる」「妨げる」「裏をかく」という意味です(野球のボークですね)。
Balkingパターンは、 「オブジェクトの状態が不都合なときメソッドの実行を行わない」 というパターンです。 以下の擬似コードを見たほうがわかりやすいでしょう。
class Something {
    private volatile boolean busy = false;
    void execute() {
        synchronized (this) {
            if (busy) {
                return;
            }
            busy = true;
        }
        // do something
        busy = false;
    }
}
executeメソッドを呼び出すと、まずbusyフィールドを調べます。 もしもbusyがtrueならreturnします (状態が不都合なときメソッドの実行を行わない)。 もしもbusyがfalseならbusyをtrueにして処理をはじめます。 そして処理が終わったらbusyをfalseにします。
busyの値がtrueなら「忙しい」 falseなら「忙しくない」と読みかえると理解しやすいでしょう。
上記の「do something」の部分を実行するのは1つのスレッドだけです。 もしも1つのスレッドがここを実行中のときbusyフィールドはtrueです。 このとき、他のスレッドが(同じオブジェクトの)executeを実行しようとすると、 busyがtrueなので処理を行わずにすぐ帰ります。
※ここで「すぐ帰らず、busyがfalseになるまで待つ」となると、 Guarded Suspensionパターンになります。
※メソッドexecute全体をsynchronizedメソッドにする必要はありません。 なぜでしょう(というのはJavaのクイズになりますね)。
これがBalkingパターンの骨組みです。
具体例を以下に示します。
これは「3人の皿洗い」です。 皿は1枚。
import java.util.Random;

class Dish {
    private Random random = new Random();
    private volatile boolean washing = false;
    public void wash() {
        synchronized (this) {
            if (washing) {
                System.out.println("    Balk : " + Thread.currentThread().getName());
                return;
            }
            washing = true;
        }
        rawWash();
        washing = false;
    }

    private void rawWash() {
        System.out.println("Start washing :" + Thread.currentThread().getName());
        try {
            Thread.sleep(random.nextInt(5000));
        } catch (InterruptedException e) {
        }
        System.out.println("End washing :" + Thread.currentThread().getName());
    }
}

class Worker extends Thread {
    private Random random = new Random();
    private Dish dish;
    public Worker(Dish dish) {
        this.dish = dish;
    }
    public static void main(String[] args) {
        Dish dish = new Dish();
        new Worker(dish).start();
        new Worker(dish).start();
        new Worker(dish).start();
    }
    public void run() {
        while (true) {
            dish.wash();
            System.out.println("    Work : " + Thread.currentThread().getName());
            try {
                Thread.sleep(random.nextInt(5000));
            } catch (InterruptedException e) {
            }
        }
    }
}
実行例は以下です。
Start washing :Thread-0
    Balk : Thread-1
    Work : Thread-1
    Balk : Thread-2
    Work : Thread-2
End washing :Thread-0
    Work : Thread-0
Start washing :Thread-1
    Balk : Thread-2
    Work : Thread-2
End washing :Thread-1
    Work : Thread-1
Start washing :Thread-2
    Balk : Thread-0
    Work : Thread-0
    Balk : Thread-1
    Work : Thread-1
    Balk : Thread-0
    Work : Thread-0
End washing :Thread-2
Before/After(ビフォー・アフター)パターンの話をしましょう。
before()→execute()→after()という順番でメソッドを呼び出したいとします。 すぐに思いつくのが、次のような方法です。
before();
execute();
after();
でもこの方法だと、execute()の中で例外を投げられたときに、 after()が実行されません。 そこで、次のようにします。
before();
try {
    execute();
} finally {
    after();
}
catchのないtryというのはちょっと奇妙ですが、 これは正しいJavaのコードです。 そして、before()が正常に終了した(つまり例外は投げられなかった)なら、 execute()で何が起ころうとも(除くexit)、 after()が呼び出されます。
このようなBefore/Afterパターンは次のようなときによく使います。
allocate_resource();
try {
    use_resource();
} finally {
    free_resource();
}
このfinallyを使う方法と、 Template Methodパターンを組み合わせると、 簡単なフレームワークが作れます。
public abstract class Executor {
    protected abstract void before();
    protected abstract void execute();
    protected abstract void after();
    public void perform() {
        before();
        try {
            execute();
        } finally {
            after();
        }
    }
}
もちろん、Executorのサブクラスがbefore, execute, afterメソッドを実装するわけです。
JUnitでは、これと似た構造が使われています。 そう、setUp→test実行→tearDownの流れです。 以下はコードスケッチです。
public void run() {
    setUp();
    try {
        runTest();
    } finally {
        tearDown();
    }
}
ところで、ふと、思いついたのですが、 もしもinitiallyという(何もしない)キーワードがあったら、 次のように美しくインデントを整えて書くことができますね。
public void run() {
    initially {
        setUp();
    } try {
        runTest();
    } finally {
        tearDown();
    }
}
Before/Afterパターンは以下の本に登場します (initiallyの話は出てきませんけれど)。
追加情報: 上記をデザインパターン・メーリングリストに出したところ、 以下の関連情報をいただきました。 早川さん、太田さん、島田さん、感謝します。
追記
Future(フューチャー)パターンのお話です。
あるメソッドを呼び出すとします。 もしもオブジェクトが、そのメソッドを実行できる状態なら、実行します。 でも、実行できない状態なら、 将来実行できる状態になるまで待つようにしたいとします。 その時に使えるのがこのFutureパターンです。 futureは「未来」という意味です。
もう少し正確にお話しましょう。 単にあるクラスに 「実行できる状態になるまで待つ」 という機能を入れるわけではありません。 すでに存在しているクラスに一皮かぶせて、 「実行できる状態になるまで待てるような機能を追加する」 というのがFutureパターンです。
サンプルプログラムを見てみましょう。 ここには、 文字列を表示するという機能を持つ既存のクラスRealPrinterがあります。 RealPrinterクラスに一皮かぶせるのがFuturePrinterクラスです。 FuturePrinterクラスが「待つ」機能を追加しています。 PrinterインタフェースはFuturePrinterとRealPrinterを同一視するためのものです。 Mainクラスは動作を確かめるためのテスト用です。
FuturePrinterには2つのメソッド(printとsetPrinter)があります。 printは文字列表示のためのもので、 setPrinterはRealPrinterのインスタンスをセットするためのものです。 printで、もしも委譲先のprinterが存在しなかったらGuarded Suspensionによってwaitします。 そしてsetPrinterでセットされてから実際に表示を行います。
Mainクラスは新たなスレッドを1つ作ります。 そのスレッドは約10秒後にsetPrinterを呼び出します。 そこで具体的なRealPrinterをセットされるまでは、 mainスレッド側のprintメソッドの実行は遅延されます。
interface Printer {
    public abstract void print(String s);
}

class RealPrinter implements Printer {
    public void print(String s) {
        System.out.println("\tRealPrinter prints \"" + s + "\"");
    }
}

class FuturePrinter implements Printer {
    private Printer printer;
    public synchronized void print(String s) {
        while (printer == null) {
            try {
                System.out.println("\tIn FuturePrinter: wait");
                wait();
            } catch (InterruptedException e) {
            }
        }
        System.out.println("\tIn FuturePrinter: printing start.");
        printer.print(s);
    }
    public synchronized void setPrinter(Printer printer) {
        this.printer = printer;
        notifyAll();
    }
}

class Main extends Thread {
    private static FuturePrinter printer;
    public static void main(String[] args) {
        printer = new FuturePrinter();
        new Main().start();
        System.out.println(Thread.currentThread().getName() + " is printing...");
        printer.print("Hello, world (1).");
        printer.print("Hello, world (2).");
        printer.print("Hello, world (3).");
    }
    public void run() {
        System.out.println(Thread.currentThread().getName() + " is sleeping.");
        try {
            Thread.sleep(10000);
        } catch (InterruptedException e) {
        }
        System.out.println(Thread.currentThread().getName() + " sets a RealPrinter.");
        printer.setPrinter(new RealPrinter());
    }
}
実行例は以下です。 Thread-0がRealPrinterのインスタンスをセットするまで、 実際の文字列表示が遅延されているのがわかります。
main is printing...
Thread-0 is sleeping.
        In FuturePrinter: wait
        …ここでしばらく待つ…
Thread-0 sets a RealPrinter.
        In FuturePrinter: printing start.
        RealPrinter prints "Hello, world (1).".
        In FuturePrinter: printing start.
        RealPrinter prints "Hello, world (2).".
        In FuturePrinter: printing start.
        RealPrinter prints "Hello, world (3).".
FutureパターンはDoug Leaの 『Javaスレッドプログラミング——並列オブジェクト指向プログラミングの設計原理』 に登場します。
FuturePrinterはRealPrinterを知っていますが、 RealPrinterはFuturePrinterを知らないことに注目します。 既存のクラスRealPrinterに対して、新たにFuturePrinterを作れたように、 一般に「既存のクラスのFuture役を作る」という考え方があることを覚えておきましょう。
Futureパターンはメソッドの「実行結果を待つ」という機能をカプセル化しているともいえます。
FutureパターンはProxyパターンと一種と見なすこともできます。
以下は助田雅紀さんによるFutureパターンのRuby版です。
Ruby版を実装してみました。
Ruby 1.6.4で確認してます。

ポイントは

(1) interface Printer に相当するものが無い(必要ない)。
(2) wait() notifyAll() に相当するメソッドがRubyには無いので適当に
    ThreadMonitorable をでっちあげてみた。
    # moduleは、デフォルト実装つきのJavaのinterfaceみたいなもんです。
(3) InterruptException 例外処理は省略。^^;;
    # begin rescue endで囲めば良さそうですが、Java版の動作と
    # 同じになってるのかどうか自信が無かったので。

できるだけ比較しやすいようにJava版にあわせたつもりです。

移植してみて感じたことは、JavaとRubyとでは、スレッドプログラミングの
流儀に違いがあるということでしょうか。Javaの方が抽象化というかフレー
ムワーク化が一歩進んでいるような印象を受けました。
単純に置きかえるというわけにはいかないですね。

念のため、つけ加えておくと、Javaはど素人ですし、Rubyの方もスレッド
プログラミングはほとんど書いたことが無いので、バグがあるかも知れません。

助田 雅紀
require 'thread'

module ThreadMonitorable
  def wait
    if !@threads
      @threads = []
    end
    @threads.push Thread.current
    Thread.stop
  end
  def notifyAll
    @threads.each do |thread|
      thread.wakeup
    end
  end
end

class RealPrinter
  def print(s)
    puts ("\tRealPrinter prints \"" + s + "\"")
  end
end

class FuturePrinter
  include ThreadMonitorable
  def initialize
    @m1 = Mutex.new
    @m2 = Mutex.new
  end
  def print(s)
    @m1.synchronize {
      while @m2.synchronize {@printer == nil}
    puts("\tIn FuturePrinter: wait")
    wait
      end
      puts("\tIn FuturePrinter: printing start.")
      @printer.print(s)
    }
  end
  def setPrinter(printer)
    @m2.synchronize {
      @printer = printer
      notifyAll
    }
  end
end

class Main
  @@printer = FuturePrinter.new
  def Main.main
    Main.new.run
    puts(Thread.current.to_s + " is printing...")
    @@printer.print("Hello world(1)")
    @@printer.print("Hello world(2)")
    @@printer.print("Hello world(3)")
  end
  def run
    Thread.start {
      puts(Thread.current.to_s + " is sleeping.")
      sleep(10);
      puts(Thread.current.to_s + " sets a RealPrinter.")
      @@printer.setPrinter(RealPrinter.new);
    }
  end
end

Main.main
#<Thread:0x2aa25c0> is sleeping.
#<Thread:0x2ab5718> is printing...
        In FuturePrinter: wait
#<Thread:0x2aa25c0> sets a RealPrinter.
        In FuturePrinter: printing start.
        RealPrinter prints "Hello world(1)"
        In FuturePrinter: printing start.
        RealPrinter prints "Hello world(2)"
        In FuturePrinter: printing start.
        RealPrinter prints "Hello world(3)"
Generation Gap(ジェネレーション・ギャップ)パターンのお話をします。
この「デザインパターン紹介」では小さなサンプルプログラムを使って、 デザインパターンを理解しやすくしていますが、Generation Gapパターンは なかなか説明が難しいです。というのはこのパターンは、 ソースプログラムを自動生成するツールの存在を前提としているからです。
ソースを自動生成するツールにはいろいろあります。 MicrosoftのVisual...というツールにはWizardという機能があって、 ダイアログの質問に答えると、ソースのひながたを作ってくれます。 それは便利で間違いが少ないのですが、 自動生成されたソースにプログラマが手を加えた場合、 自動生成ツールを再度使いにくい、という問題があります。 自動生成ツールを再度使って、ソースを上書きしては、 せっかくプログラマが書き加えた部分が失われてしまうからです。
そこで、Generation Gapパターンでは、 継承を使ってその問題を解決します。 すなわち、自動生成ツールが作るのはスーパークラスのみとする。 そしてそれには人間は手を加えない。 人間はそのクラスのサブクラスを作る。自動生成ツールはそのサブクラスはいじらない。 …これがGeneration Gapパターンのあらすじです。
では、サンプルプログラムです。
非常に単純な自動生成ツールとして、PerlによってJavaのソースを作ることにします。 以下のPerlスクリプト(sourcemaker.pl)を動かすと、MessageBoxCore.javaというファイルが作られます。 このファイルは、複数行のメッセージボックスを表示するクラスのソースです。 ユーザがawtと入力するとjava.awt版のソースが作られ、 swingと入力するとjavax.swing版のソースが作られます。
謎のようなスクリプトですが、これを一種のWizardだと思うことにしましょう。
use MIME::Base64;
%framework = (
    'awt' => <<'EOD',
aW1wb3J0IGphdmEuYXd0LmV2ZW50Lio7CmltcG9ydCBqYXZhLmF3dC4qOwppbXBvcnQgamF2YS51
dGlsLio7CgpjbGFzcyBNZXNzYWdlQm94Q29yZSBleHRlbmRzIEZyYW1lIHsKICAgIHByaXZhdGUg
VmVjdG9yIG1lc3NhZ2VzID0gbmV3IFZlY3RvcigpOwogICAgcHVibGljIE1lc3NhZ2VCb3hDb3Jl
KFN0cmluZyB0aXRsZSkgewogICAgICAgIHN1cGVyKHRpdGxlKTsKICAgICAgICB0aGlzLmFkZFdp
bmRvd0xpc3RlbmVyKG5ldyBXaW5kb3dBZGFwdGVyKCkgewogICAgICAgICAgICBwdWJsaWMgdm9p
ZCB3aW5kb3dDbG9zaW5nKFdpbmRvd0V2ZW50IGUpIHsgU3lzdGVtLmV4aXQoMCk7IH0KICAgICAg
ICB9KTsKICAgIH0KICAgIHB1YmxpYyB2b2lkIGFkZE1lc3NhZ2UoU3RyaW5nIG1lc3NhZ2UpIHsg
bWVzc2FnZXMuYWRkKG1lc3NhZ2UpOyB9CiAgICBwdWJsaWMgdm9pZCBzaG93Qm94KCkgewogICAg
ICAgIHNldExheW91dChuZXcgR3JpZExheW91dChtZXNzYWdlcy5zaXplKCksIDEpKTsKICAgICAg
ICBmb3IgKGludCBpID0gMDsgaSA8IG1lc3NhZ2VzLnNpemUoKTsgaSsrKSB7CiAgICAgICAgICAg
IGFkZChuZXcgTGFiZWwoKFN0cmluZyltZXNzYWdlcy5nZXQoaSkpKTsKICAgICAgICB9CiAgICAg
ICAgcGFjaygpOyBzZXRWaXNpYmxlKHRydWUpOwogICAgfQogICAgcHVibGljIHN0YXRpYyB2b2lk
IG1haW4oU3RyaW5nW10gYXJncykgewogICAgICAgIE1lc3NhZ2VCb3hDb3JlIG1jb3JlID0gbmV3
IE1lc3NhZ2VCb3hDb3JlKCJqYXZhLmF3dCIpOwogICAgICAgIG1jb3JlLmFkZE1lc3NhZ2UoIkhl
bGxvLCBKYXBhbiEiKTsKICAgICAgICBtY29yZS5hZGRNZXNzYWdlKCJIZWxsbywgV29ybGQhIik7
CiAgICAgICAgbWNvcmUuc2hvd0JveCgpOwogICAgfQp9Cg==
EOD
    'swing' => <<'EOD',
aW1wb3J0IGphdmEuYXd0LmV2ZW50Lio7CmltcG9ydCBqYXZheC5zd2luZy4qOwoKY2xhc3MgTWVz
c2FnZUJveENvcmUgZXh0ZW5kcyBKRnJhbWUgewogICAgcHJpdmF0ZSBCb3ggbWVzc2FnZUJveCA9
IG5ldyBCb3goQm94TGF5b3V0LllfQVhJUyk7CiAgICBwdWJsaWMgTWVzc2FnZUJveENvcmUoU3Ry
aW5nIHRpdGxlKSB7CiAgICAgICAgc3VwZXIodGl0bGUpOwogICAgICAgIHRoaXMuYWRkV2luZG93
TGlzdGVuZXIobmV3IFdpbmRvd0FkYXB0ZXIoKSB7CiAgICAgICAgICAgIHB1YmxpYyB2b2lkIHdp
bmRvd0Nsb3NpbmcoV2luZG93RXZlbnQgZSkgeyBTeXN0ZW0uZXhpdCgwKTsgfQogICAgICAgIH0p
OwogICAgICAgIGdldENvbnRlbnRQYW5lKCkuYWRkKG1lc3NhZ2VCb3gpOwogICAgfQogICAgcHVi
bGljIHZvaWQgYWRkTWVzc2FnZShTdHJpbmcgbWVzc2FnZSkgeyBtZXNzYWdlQm94LmFkZChuZXcg
SkxhYmVsKG1lc3NhZ2UpKTsgfQogICAgcHVibGljIHZvaWQgc2hvd0JveCgpIHsgcGFjaygpOyBz
ZXRWaXNpYmxlKHRydWUpOyB9CiAgICBwdWJsaWMgc3RhdGljIHZvaWQgbWFpbihTdHJpbmdbXSBh
cmdzKSB7CiAgICAgICAgTWVzc2FnZUJveENvcmUgbWNvcmUgPSBuZXcgTWVzc2FnZUJveENvcmUo
IlN3aW5nIik7CiAgICAgICAgbWNvcmUuYWRkTWVzc2FnZSgiSGVsbG8sIEphcGFuISIpOwogICAg
ICAgIG1jb3JlLmFkZE1lc3NhZ2UoIkhlbGxvLCBXb3JsZCEiKTsKICAgICAgICBtY29yZS5zaG93
Qm94KCk7CiAgICB9Cn0K
EOD
);
print "Enter framework (awt or swing):\n";
chomp($f = <STDIN>);
if (exists($framework{$f})) {
    open(FILE, "> MessageBoxCore.java") or die;
    print FILE MIME::Base64::decode($framework{$f});
    close(FILE);
    print "MessageBoxCore.java is created.\n";
} else {
    print "$f: Unknown framework.\n";
}
実行例は次のとおり。
Enter framework (awt or swing):
awt                                 ←java.awt版を選択
MessageBoxCore.java is created.
自動生成されたjava.awt版のMessageBoxCore.javaはこんな風。
import java.awt.event.*;
import java.awt.*;
import java.util.*;

class MessageBoxCore extends Frame {
    private Vector messages = new Vector();
    public MessageBoxCore(String title) {
        super(title);
        this.addWindowListener(new WindowAdapter() {
            public void windowClosing(WindowEvent e) { System.exit(0); }
        });
    }
    public void addMessage(String message) { messages.add(message); }
    public void showBox() {
        setLayout(new GridLayout(messages.size(), 1));
        for (int i = 0; i < messages.size(); i++) {
            add(new Label((String)messages.get(i)));
        }
        pack(); setVisible(true);
    }
    public static void main(String[] args) {
        MessageBoxCore mcore = new MessageBoxCore("java.awt");
        mcore.addMessage("Hello, Japan!");
        mcore.addMessage("Hello, World!");
        mcore.showBox();
    }
}
一方、プログラマは、MessageBoxCoreはいじらず、 MessageBoxCoreのサブクラスMyMessageBoxを作ります。 MyMessageBoxでは、 継承したaddMessageやshowBoxを利用してプログラミングします。 でもMessageBoxCoreの実装詳細に依存したコードにはしません。
class MyMessageBox extends MessageBoxCore {
    public MyMessageBox(String title, String[] msgs) {
        super(title);
        for (int i = 0; i < msgs.length; i++) {
            addMessage(msgs[i]);
        }
        showBox();
    }
    public static void main(String[] args) {
        if (args.length == 0) {
            System.out.println("Usage: java MyMessageBox title msg1 msg2 msg3 ...");
            System.exit(0);
        }
        String[] msgs = new String[args.length - 1];
        System.arraycopy(args, 1, msgs, 0, args.length - 1);
        new MyMessageBox(args[0], msgs);
    }
}
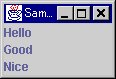
まあ、小さなプログラムですけれど、動かしてみましょう。
java MyMessageBox Sample Hello Good Nice
ではここで、私たちの「自動生成ツール」sourcemaker.plを再起動してみます。 今度はjavax.swing版のMessageBoxCoreの生成です。
Enter framework (awt or swing):
swing                               ←javax.swing版を選択
MessageBoxCore.java is created.
さっきのMessageBoxCore.javaは書き換えられて、こんな風になりました。 似ているけれど、けっこう違いますね…。
import java.awt.event.*;
import javax.swing.*;

class MessageBoxCore extends JFrame {
    private Box messageBox = new Box(BoxLayout.Y_AXIS);
    public MessageBoxCore(String title) {
        super(title);
        this.addWindowListener(new WindowAdapter() {
            public void windowClosing(WindowEvent e) { System.exit(0); }
        });
        getContentPane().add(messageBox);
    }
    public void addMessage(String message) { messageBox.add(new JLabel(message)); }
    public void showBox() { pack(); setVisible(true); }
    public static void main(String[] args) {
        MessageBoxCore mcore = new MessageBoxCore("Swing");
        mcore.addMessage("Hello, Japan!");
        mcore.addMessage("Hello, World!");
        mcore.showBox();
    }
}
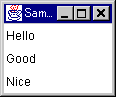
自動生成ツール(sourcemaker.pl)は、 MyMessageBox.javaには変更を加えません。 MessageBoxCoreの再コンパイルは必要ですが、 MyMessageBoxの方は、再コンパイルする必要もありません。 実行してみましょう!
java MyMessageBox Sample Hello Good Nice
少々わかりにくかったですが、 まとめますと、Generation Gapパターンというのはこういうものです。
こうしておけば、自動生成ツールを再実行しても、 プログラマが作った部分を壊されたりする心配はありません。
Remote Method Invocation(RMI)のスケルトンを作るところも(rmic)、 このパターンの一種になるでしょうか…。
このパターンは、以下の本に登場します。 ジョン・ブリシデスさんはGoFの1人です。
Hook Operation(フック・オペレーション)パターンのお話をします。
このパターンは、メソッドの実際の処理の前後に「フック」をつけておき、 前処理・後処理を別のクラスに行わせるものです。 バリエーションとしては、前処理・後処理の片方だけでもかまいません。
hookは「ひっかけるカギ、ホック、留め金」という意味、 operationは「操作」という意味です。 ちなみにhookerになると「ひっかけるもの」という意味もありますが、 「売春婦」という意味にもなりますのでご注意ください。
さて、以下のプログラム例では、 Buttonクラスのクリックの処理(doClick)の中で フックが使われています。 実際の処理(click)の前後で、Buttonクラスのフィールドhookを使って、 前処理(hook.preHook)と後処理(hook.postHook)をそれぞれ行っています。
テスト用のクラスMainでは、 button1というインスタンスは何もしないフック(NullHook)を持ち、 button2というインスタンスは文字列を表示するフック(LogHook)を持っています。 Buttonクラスを書き換えることなく、button1.doClickとbutton2.doClickの振る舞いを 変えることができることがわかるでしょうか。
class Button {
    private String name;
    private Hook hook;
    public Button(String name, Hook hook) {
        this.name = name;
        this.hook = hook;
    }
    public Button(String name) {
        this(name, new NullHook());
    }
    public final void doClick() {
        hook.preHook();
        click();
        hook.postHook();
    }
    protected void click() {
        System.out.println(name + ":click");
    }
}

abstract class Hook {
    public abstract void preHook();
    public abstract void postHook();
}

class NullHook extends Hook {
    public void preHook() { }
    public void postHook() { }
}

class LogHook extends Hook {
    public void preHook() { System.out.println("LogHook:preHook"); }
    public void postHook() { System.out.println("LogHook:postHook"); }
}

class Main {
    public static void main(String[] args) {
        Button button1 = new Button("button1");
        button1.doClick();

        System.out.println("");
        Button button2 = new Button("button2", new LogHook());
        button2.doClick();
    }
}
実行結果は次のようになります。
button1:click           ←clickとだけ表示される

LogHook:preHook         ←LogHookが表示
button2:click           ←Buttonが表示
LogHook:postHook        ←LogHookが表示
このHook Operationパターンには他のパターンがいくつか登場しています。
例えば、ButtonクラスのdoClickメソッドにはGoFのTemplate Methodパターンが使われています。 doClickはfinalですが、 clickメソッドをサブクラスでオーバーライドすることで別のButtonクラスを作ることができます。
また、NullHookクラスは、Buttonクラスと共に Null Objectパターンを構成しています。何もしないpreHook, postHookメソッドを用意することで、 Buttonクラスのhookフィールドが「nullだったら」「nullでなかったら」 という条件判断が不要になります。
この実装例には登場しませんが、 具体的なHook役を作り出すのにFactory Methodパターンを使うことも可能でしょう。 またこの例ではhookフィールドを使ってフックの処理を委譲させていますが、 preHook, postHookをButtonクラスのメソッドにして、 継承だけを使うことも可能です。
さまざまな実装例、バリエーションについては、 以下のページをごらんください。 このページには、Visual FoxProの例も登場します。
以下は助田雅紀さんによるHook OperationパターンのRuby版です。
例によってRuby版です。
Javaのfinalに相当するものはRuby標準では用意されていないので略。

 # ごとけんさんの preserved ライブラリを使えば、final に相当するものが
 # 実現できます。
 # http://www.notwork.org/~gotoken/ruby/p/preserved/preserved-20001017.tar.gz
class Button
  def initialize(name, hook = NullHook.new)
    @name = name
    @hook = hook
  end
  def doClick
    @hook.preHook
    click
    @hook.postHook
  end
  def click
    puts(@name + ":click");
  end
end

class NullHook
  def preHook
  end
  def postHook
  end
end

class LogHook
  def preHook
    puts("LogHook:preHook")
  end
  def postHook
    puts("LogHook:postHook")
  end
end

class Main
  def Main.main
    button1 = Button.new("button1")
    button1.doClick()

    puts("")
    button2 = Button.new("button2", LogHook.new)
    button2.doClick()
  end
end
Main.main
public final class Rectangle {
    private int width;
    private int height;
    private int area;
    public Rectangle(int width, int height) {
        this.width = width;
        this.height = height;
        this.area = width * height;
    }
    public int getWidth() {
        return width;
    }
    public int getHeight() {
        return height;
    }
    public int getArea() {
        return area;
    }
}
このRectangleクラスは、 Immutable(イミュータブル)パターン (by Mark Grand)を構成しています。 immutableとは「不変の」「変わることがない」という意味です。
Rectangleには、 内部状態(width, height, area)を変更するメソッドがありません。 ですから、Rectangleクラスのインスタンスは、 作られた後、内部状態を変更することはありません。
したがって、synchronized修飾子などで マルチスレッドによる不整合を防ぐ必要がありません。
実装上の注意(1): finalなclassにしないと、サブクラスを作ることができます。 その場合、getWidth, getHeight, getAreaメソッドをオーバーライドされて、 期待した動作を行わなくなってしまう場合があります。
実装上の注意(2): 内部の構築はすべてコンストラクタで行います。 ImmutableなクラスはsetXXXXのメソッド(setterメソッド)を持たないからです。
実装上の注意(3): コンストラクタの引数が参照型の場合、 コンストラクタ内部でオブジェクトをコピー(clone)します。 単に引数で渡された参照を保持してはいけません。 さもないと、 Immutableなインスタンスを生成した側に、内部状態を変更されてしまう可能性があります。
Marker Interface(マーカー・インタフェース)パターンは、 メソッドが宣言されておらず、 単に印付けとして使われているインタフェースを使ったパターンです。 印付けとして使われているインタフェースとは、 Java APIでいえば、次のようなものです。
メソッドが宣言されていないインタフェースが何の役に立つのでしょう?
例えば、変数に、あるオブジェクトを代入するとしましょう。 変数の型が印付けのインタフェース型だとすると、 その変数にはそのインタフェースを実装したクラスのインスタンスしか 代入することはできません。 コンパイル時の型チェックにひっかかるからです(メソッドの引数なども同様)。
また、一般的なjava.lang.Objectを受け取るメソッドの中で、 instanceofにより印がついているか(marked)、 ついていないか(unmarked)を調べることも可能です (java.io.ObjectOutputStreamのwriteObjectメソッド参照)。
印付けを行うだけではなく、 メソッドも追加したい場合には、 インタフェースをextendsしてサブインタフェースを作ります。 例えば、java.lang.Cloneableインタフェースのサブインタフェースとして、 java.text.CharacterIteratorがあります。
Monostate(モノステート)パターンの話をしましょう。 Monostateパターンでは、 クラスのすべてのフィールドをクラスフィールドにします。 これによって、 「実質的にそのクラスのインスタンスが1つしか存在しない」のと同じ状態が実現されます 実際にインスタンスはいくつ存在してもよいが、 フィールドはクラスフィールドだけなので実質的に状態が1つしか取りえません。
mono(モノ)は「1つの」、 state(ステート)は「状態」という意味です。
以下に例を示します。 ここではシステム全体の「テーマ」を管理するクラスをMonostateパターンを使って実装しています。
class MonostateTheme {
    private static String theme = "classic";
    public String getTheme() {
        return theme;
    }
    public void setTheme(String theme) {
        MonostateTheme.theme = theme;
    }
}

class Main {
    public static void main(String[] args) {
        MonostateTheme monotheme = new MonostateTheme();
        System.out.println("Monostate...");
        System.out.println("Current theme = " + monotheme.getTheme());
        monotheme.setTheme("modern");
        System.out.println("Current theme = " + monotheme.getTheme());
    }
}
MonostateパターンはGoFのSingletonパターンと似ています。 上記と同等の機能を持つクラスをSingletonパターンを使って書いたものは以下のようになります。 Singletonパターンはインスタンスは「1つだけ」存在します。
class SingletonTheme {
    private static SingletonTheme singleton = new SingletonTheme();
    private String theme = "classic";
    private SingletonTheme() {
    }
    public String getTheme() {
        return theme;
    }
    public void setTheme(String theme) {
        this.theme = theme;
    }
    public static SingletonTheme getInstance() {
        return singleton;
    }
}

class Main {
    public static void main(String[] args) {
        System.out.println("Singleton...");
        System.out.println("Current theme = " + SingletonTheme.getInstance().getTheme());
        SingletonTheme.getInstance().setTheme("modern");
        System.out.println("Current theme = " + SingletonTheme.getInstance().getTheme());
    }
}
Singletonパターンでは、 外部からのインスタンス生成を禁止するため、 コンストラクタがprivateになっていることに注意しましょう。
助田です。
こんな感じでしょうか。
class MonostateTheme
  @@theme = "classic"
  def getTheme
    @@theme
  end
  def setTheme(theme)
    @@theme = theme
  end
end

class Main
  def Main.main
    monotheme = MonostateTheme.new
    puts("Monostate...")
    puts("Current theme = " + monotheme.getTheme)
    monotheme.setTheme("modern")
    puts("Current theme = " + monotheme.getTheme)
  end
end
Main.main
それから、 moduleを使った[以前の]2番目と3番目の例はインスタンスを作れないのでそのままじゃ駄目ですね。 あえてmodule使うとすれば、こんな感じです。
# こっちの方が使い回しができていいかも。
module MonostateModule
  @@theme = "classic"
  def getTheme
    @@theme
  end
  def setTheme(theme)
    @@theme = theme
  end
end

class MonostateTheme
  include MonostateModule
end
以下上の例と同じ。
それから、インスタンスをいくつ作っても状態は1つになるということなので
class Main
  def Main.main
    mono1 = MonostateTheme.new
    puts("Monostate...")
    puts("Current theme = " + mono1.getTheme)
    mono1.setTheme("modern")
    puts("Current theme = " + mono1.getTheme)
    mono2 = MonostateTheme.new
    puts("Current theme = " + mono2.getTheme)
    mono2.setTheme("classic")
    puts("Current theme = " + mono1.getTheme)
  end
end
のような2つ以上インスタンスを作る例もあった方がいいような気がします。
助田 雅紀
宮川です。
package MonostateTheme;

my $theme = 'classic';
sub theme {
    my $class = shift;
    $theme = shift if @_;
    $theme;
}

sub new { bless {}, shift }

1;
これだけでは面白くないので、以下に、一見すると不思議なコードを。
# 他の言語と見比べられるように set/get を分けました。
package MonostateTheme;
$MonostateTheme{theme} = 'classic';

sub get_theme {
    my $self = shift;
    return $self->{theme};
}

sub set_theme {
    my($self, $theme) = @_;
    $self->{theme} = $theme;
}

sub new { shift }

package main;
my $monotheme  = MonostateTheme->new;
print "Monostate...\n";
print "Current theme = ", $monotheme->get_theme, "\n";
$monotheme->set_theme('modern');
print "Current theme = ", $monotheme->get_theme, "\n";
以下に示すNullOutputStreamクラスは、 「writeしても実際には何も処理しない」クラスです。
NullPrintStreamクラスは、NullOutputStreamクラスを使って 「printlnしても実際には何も処理しない」クラスです。
Applicationクラスは、 「0〜9までの整数を合計する」という処理を行うアプリケーションです。 Applicationクラスは、 このNullPrintStreamクラスを使うと、 Applicationクラスのソースを書き換えることなく、 デバッグプリントの有無を切り換えることができます。
Mainクラスは、テスト動作用のクラスです。 オプション-dを使って起動するとデバッグプリントありになり、-nを使って起動するとデバッグプリントなしになります。
デバッグプリントありのときはi=0〜9までの経過と結果を表示し、 なしのときは結果のみを表示します。
import java.io.*;

class NullOutputStream extends OutputStream {
    public void write(int b) {
        // Do nothing
    }
}

class NullPrintStream extends PrintStream {
    public NullPrintStream() {
        super(new NullOutputStream());
    }
}

class Application {
    private PrintStream debugout;
    public Application(PrintStream debugout) {
        this.debugout = debugout;
    }
    public void go() {
        int sum = 0;
        for (int i = 0; i < 10; i++) {
            sum += i;
            debugout.println("i = " + i);
        }
        System.out.println("sum = " + sum);
    }
}

class Main {
    public static void main(String[] args) {
        if (args.length == 0) {
            System.out.println("Usage: java Main -d         - for debug");
            System.out.println("Usage: java Main -n         - not for debug");
            System.exit(0);
        }
        if (args[0].equals("-d")) {
            new Application(System.out).go();
        } else {
            new Application(new NullPrintStream()).go();
        }
    }
}
ここで重要なのは、
debugout.println("i = " + i);
の部分です。 もしもデバッグプリントの有無をフラグなどで判断するとすると、 ここは、
if (debug) {
    debugout.println("i = " + i);
}
になったり、あるいは、 デバッグプリントなしのときはdebugoutにnullを詰めることにして、
if (debugout != null) {
    debugout.println("i = " + i);
}
のように判断するでしょう。もしかしたら、 もっと大胆に、
// debugout.println("i = " + i);
のようにコメントアウトするかもしれませんね。 その場合には、出力するときにコメントをはずして再コンパイルが必要になってしまいます。
でも、このNullPrintStreamのような 「同じインタフェース(API)を持ちながら、何も処理しないクラス」 を使えば、 条件判断が不要になり、利用する側をシンプルにすることができます。
出力の有無をコントロールするには、 Applicationに渡すOutputStreamを変えます。 つまり、Applicationのソースコードの修正を行わずに、 出力の有無を制御できることになります。
このような、 何も処理を行わないクラスを利用したデザインパターンを、Null Object(ナル・オブジェクト)パターンと呼びます。
このデザインパターンはBobby Woolfによって提案されました。
ロギングAPIであるApache log4jでは、 Null Objectパターンに似た構造を持っているそうです(Thank you, 高橋さん)。
Null Objectパターンは、Strategyパターンと共に使われることがあります (いわばNullConcreteStrategyの役を作るわけです)。
Null ObjectパターンのNullOperation役(NullPrintStreamクラスに相当する役割) がインスタンス固有の情報を持たない場合には、 Singletonパターンと共に使われることがあります。
上で示したNullOutputStreamとNullPrintStreamをSingletonパターンで書いてみました。
import java.io.*;

class NullOutputStream extends OutputStream {
    private static NullOutputStream singleton = new NullOutputStream();
    private NullOutputStream() {
    }
    public static NullOutputStream getInstance() {
        return singleton;
    }
    public void write(int b) {
        // Do nothing
    }
}

class NullPrintStream extends PrintStream {
    private static NullPrintStream singleton = new NullPrintStream();
    private NullPrintStream() {
        super(NullOutputStream.getInstance());
    }
    public static NullPrintStream getInstance() {
        return singleton;
    }
}

class Application {
    private PrintStream debugout;
    public Application(PrintStream debugout) {
        this.debugout = debugout;
    }
    public void go() {
        int sum = 0;
        for (int i = 0; i < 10; i++) {
            sum += i;
            debugout.println("i = " + i);
        }
        System.out.println("sum = " + sum);
    }
}

class Main {
    public static void main(String[] args) {
        if (args.length == 0) {
            System.out.println("Usage: java Main -d         - for debug");
            System.out.println("Usage: java Main -n         - not for debug");
            System.exit(0);
        }
        if (args[0].equals("-d")) {
            new Application(System.out).go();
        } else {
            new Application(NullPrintStream.getInstance()).go();
        }
    }
}
Producer-Consumer(プロデューサ・コンシューマ)パターンのお話をしましょう。
これはOS、マルチタスク、マルチスレッドの本などによく登場するパターンです。
producerというのはデータを生産する生産者、 consumerというのはデータを消費する消費者のことです。
producerはデータを生産し、それをどこかに置きます。 consumerは置かれたデータをとって処理をします。 要するにそれだけのことなのですが、ここにさまざまな制約事項をつけます。
以下のサンプルプログラムはProducer-Consumerパターンの例ですが、 次のような制約があります。
並行性や排他制御に慣れていないと、どこに制約があるのかわかりませんね。 もう少しはっきり書きましょう。
という制約があります。
サンプルプログラムは以下です。 動きに変化をつけるためにheavyJobメソッドでランダム時間待っています。
import java.util.Random;

class Table {
    private Random random = new Random();
    private String food_on_table = null;
    synchronized void put(String food) throws InterruptedException {
        while (food_on_table != null) {
            System.out.println(Thread.currentThread().getName() + " waits (put)");
            wait();
        }
        System.out.println(Thread.currentThread().getName() + " puts " + food);
        food_on_table = food;
        heavyJob();
        System.out.println(food_on_table + " is on the table.");
        notifyAll();
    }
    synchronized String eat() throws InterruptedException {
        while (food_on_table == null) {
            System.out.println(Thread.currentThread().getName() + " waits (eat)");
            wait();
        }
        String food = food_on_table;
        System.out.println(Thread.currentThread().getName() + " eats " + food);
        food_on_table = null;
        heavyJob();
        System.out.println("Nothing is on the table.");
        notifyAll();
        return food;
    }
    private void heavyJob() throws InterruptedException {
        Thread.sleep(random.nextInt(5000));
    }
}

class Producer extends Thread {
    private int counter = 0;
    private Table table;
    private String food;
    public Producer(String food, Table table) {
        this.table = table;
        this.food = food;
    }
    public void run() {
        try {
            while (true) {
                table.put(food + " No." + counter);
                counter++;
            }
        } catch (InterruptedException e) {
            e.printStackTrace();
        }
    }
}

class Consumer extends Thread {
    private Table table;
    public Consumer(Table table) {
        this.table = table;
    }
    public void run() {
        try {
            while (true) {
                table.eat();
            }
        } catch (InterruptedException e) {
            e.printStackTrace();
        }
    }
}

class ProducerConsumerMain {
    public static void main(String[] args) {
        Table table = new Table();
        new Producer("Apple", table).start();
        new Producer("Banana", table).start();
        new Producer("Candy", table).start();
        new Consumer(table).start();
        new Consumer(table).start();
        new Consumer(table).start();
    }
}
実行例は以下です。
Thread-0 puts Apple No.0
Apple No.0 is on the table.
Thread-1 waits (put)
Thread-2 waits (put)
Thread-3 eats Apple No.0
Nothing is on the table.
Thread-4 waits (eat)
Thread-5 waits (eat)
Thread-0 puts Apple No.1
Apple No.1 is on the table.
Thread-1 waits (put)
Thread-2 waits (put)
Thread-3 eats Apple No.1
Nothing is on the table.
Thread-0 puts Apple No.2
Apple No.2 is on the table.
Thread-4 eats Apple No.2
Nothing is on the table.
Thread-5 waits (eat)
Thread-3 waits (eat)
Thread-1 puts Banana No.0
Banana No.0 is on the table.
Thread-2 waits (put)
Thread-0 waits (put)
Thread-4 eats Banana No.0
Nothing is on the table.
Thread-1 puts Banana No.1
Banana No.1 is on the table.
Thread-5 eats Banana No.1
Nothing is on the table.
Thread-3 waits (eat)
Thread-4 waits (eat)
Thread-2 puts Candy No.0
Candy No.0 is on the table.
Thread-0 waits (put)
Thread-1 waits (put)
Thread-5 eats Candy No.0
Nothing is on the table.
...
サンプルプログラムの中では、 Guarded Suspensionパターンが使われています。 ポイントを抜き出すと、
    synchronized ... {
        while (条件) {
            wait();
        }
        仕事をする
        notifyAll();
    }
の部分です。
Sharable(シェアラブル)パターンのお話をしますね。
sharableというのは、 share + able で「共有する」ことが「できる」という意味です。 Sharableパターンというのは、 あるオブジェクトを共有して使うパターンです。 共有することで、データの統一性と一貫性が保たれることになります。
以下のサンプルプログラムでは、 Monsterというクラスが登場します。 このクラスはゲームに出てくる生き物を表現したもので、 名前(name)と現在位置(pos)を持っています (簡単のため、左右にしか移動できません)。
生き物を作るときにはnew Monster("名前")するのではなく、 Monster.createMonster("名前")とします。 このcreateMonsterメソッドの中で、 同じ名前を持っている生き物がいたら、 そのMonsterオブジェクトを返します。 もしもいなかったらnew Monsterによって本当に生成します。
このようにすることで、 「同じ名前を持っているインスタンスは共有されている」 という状況が作られます。
サンプルプログラムでは、mainのはじめの方で"Pikachu"(ピカチュー)を作り、 右に3歩動かしています。 その後、プログラムは進み、 最後に、もう一度createMonster("Pikachu")によってピカチューを作ります。 しかし、このときに返されるインスタンスは、はじめに作ったインスタンスと 同じですので、pikaを表示してみると、posの値は3になっています。
import java.util.Hashtable;

class Monster {
    private String name;
    private int pos;
    private static Hashtable database = new Hashtable();
    public static synchronized Monster createMonster(String name) {
        Monster creature = (Monster)database.get(name);
        if (creature == null) {
            creature = new Monster(name);
            database.put(name, creature);
        }
        return creature;
    }
    private Monster(String name) { this.name = name; }
    public void goRight() { pos++; }
    public void goLeft() { pos--; }
    public String getName() { return name; }
    public int getPos() { return pos; }
    public String toString() { return "[" + name + " at " + pos + "]"; }
}

class Main {
    public static void main(String[] args) {
        Monster mon1 = Monster.createMonster("Pikachu");
        mon1.goRight();
        mon1.goRight();
        mon1.goRight();

        Monster mon2 = Monster.createMonster("Dodrio");
        mon2.goLeft();
        mon2.goLeft();

        Monster mon3 = Monster.createMonster("Metapod");
        mon3.goRight();
        mon3.goRight();
        mon3.goRight();

        // ...

        Monster pika = Monster.createMonster("Pikachu");
        System.out.println("" + pika);
    }
}
実行結果は以下です。
[Pikachu at 3]
SharableパターンはGoFのFlyweightパターンと酷似しています。 でもこの2つのパターンは目的が違います。 Sharableパターンの目的は、オブジェクトを共有することで データの統一性、一貫性を保つことです。 一方、Flyweightパターンの目的は、効率およびリソースの節約です。
ここで、Monsterのインスタンスを作るクラスとして、 MonsterFactoryというクラスを設計することも可能です。 しかし、 このサンプルではMonsterのインスタンスを作るメソッド(createMonster)を、 Monsterのクラスメソッドとして定義することで対処しました。 このように、あるクラスのインスタンスの生成を、 そのクラスのクラスメソッドで行うことを、 Class Side Factory(クラス側の工場)と呼びます。
Sharableパターンは、以下の書籍(p.197他)に書かれています。 解説の文章およびプログラムは結城が新たに書き起こしました。
Single-Active-Instance Singleton(シングル・アクティブ・インスタンス・シングルトン)パターンのお話をします。
これはSingletonパターンの変奏曲の1つです。 とはいうものの、 このSingle-Active-Instance Singletonパターンは、 Singletonパターンのようにインスタンスが1個だけ作られるのではありません。 たくさんのインスタンスが登場するけれど、 アクティブになっているのはそのうち1個だけというのが Single-Active-Instance Singletonパターンの本質です。
さっそくサンプルを見てみましょう。
ここでは、Workerクラスが登場します。 WorkerのactiveWorkというクラスメソッドを呼び出すと、 「現在アクティブになっているインスタンスのworkメソッドを呼び出す」 という処理を行います。 インスタンスをアクティブにするのは、 activateというメソッドです。 activateは自分自身をアクティブにします。 現在アクティブになっているインスタンスはクラスフィールドactiveに保持されています。 activeは最初NullWorkerのインスタンスが保持されています。
NullWorkerクラスは何もしないWorkerです。 NullWorkerには、 Null ObjectパターンとGoFのSingletonパターンが使われていますね。
PrintWorkerのworkメソッドでは、 与えられている仕事(job)を表示します。 workメソッドは、 スーパークラスのWorkerでは抽象メソッドとして宣言されています。 ここには、 Abstract Classパターンと、GoFのTemplate Methodパターンが使われています。
Mainクラスでは、 worker1とworker2を作っておき、 それらを順にアクティブにしつつ"Hello, worker!"という お仕事をactiveWorkメソッドを使って「実行」しています。
abstract class Worker {
    private static Worker active = NullWorker.getInstance();
    private String name;
    public Worker(String name) {
        this.name = name;
    }
    public final void activate() {
        synchronized (Worker.class) {
            active = this;
        }
    }
    public String toString() {
        return "[Worker " + name + "]";
    }
    public static synchronized void activeWork(String job) {
        active.work(job);
    }
    public abstract void work(String job);
}

class NullWorker extends Worker {
    private static NullWorker singleton = new NullWorker();
    private NullWorker() {
        super("The NullWorker");
    }
    public static NullWorker getInstance() {
        return singleton;
    }
    public void work(String job) {
        System.out.println("(" + job + " is ignored by NullWorker)");
    }
}

class PrintWorker extends Worker {
    public PrintWorker(String name) {
        super(name);
    }
    public void work(String job) {
        System.out.println(this + " does \"" + job + "\".");
    }
}

class Main {
    public static void main(String[] args) {
        Worker worker1 = new PrintWorker("worker1");
        Worker worker2 = new PrintWorker("worker2");

        Worker.activeWork("Hello, worker!");
        worker1.activate();
        Worker.activeWork("Hello, worker!");
        worker2.activate();
        Worker.activeWork("Hello, worker!");
    }
}
実行結果は次のようになります。
(Hello, worker! is ignored by NullWorker)
[Worker worker1] does "Hello, worker!".
[Worker worker2] does "Hello, worker!".
このパターンは、以下の書籍(p.93)に書かれています。 解説の文章およびプログラムは結城が新たに書き起こしました。
練習問題1
activateメソッドの中でsynchronizedブロックを作っています。 これはactiveフィールドを守るためのものですが、 ロックオブジェクトとしてWorker.classを使っていることに注意しましょう。 activateメソッドを単にsynchronizedメソッドにしても無意味です。 なぜ無意味なのでしょう。
練習問題2
サンプルプログラムでは、最初NullWorkerのインスタンスがWorkerクラスの activeフィールドに代入されていました(これは誰もアクティブではない、 ということを表現しています)。それからworker1、次にworker2と、 activeフィールドに代入されているインスタンスは変化していきます。 ところで、もう一度「誰もアクティブではない」状態にしようと思ったときには、 どうしたらいいでしょうか(NullWorkerのコンストラクタはprivateなので、 Mainクラスからnew NullWorker()することはできません)。
以下は助田雅紀さんによるSingle-Active-Instance SingletonパターンのRuby版です。
# なんかRubyらしい実装が他にありそうな気もするんですが
# 今のところ思いつきません。

Rubyでは、NullWorkerの定義が2つに分かれてます。
Worker を定義するときに

  @@active = NullWorker.instance

とNullWorkerを使用するのでNullWorkerが事前に定義されていないとエラー
になります。
一方で、NullWorkerを定義するときに

  include Worker

と Worker を使用するのでWorkerが事前に定義されていないとこれまた
エラーになります。

そこで、Workerを定義するときに最低限必要なNullWorkerを事前に定義
して、Workerを参照するNullWorkerの定義は後回しにしてこれを回避しています。

# Javaでは、こんなわずらわしいことは考えなくてもいいんですね。

RubyではWorkerモジュールのクラス変数@@mutexを使ってロックしています。
インスタンス変数@mutexじゃないところがポイントです。
require 'singleton'
require 'thread'

class NullWorker
  include Singleton
end

module Worker
  @@active = NullWorker.instance
  @@mutex = Mutex.new
  def initialize(name)
    @name = name
  end
  def activate
    @@mutex.synchronize {
      @@active = self
    }
  end
  def to_s
    "[Worker #{@name}]"
  end
  def Worker.activeWork(job)
    @@mutex.synchronize {
      @@active.work(job)
    }
  end
end

class NullWorker
  include Worker
  def initialize
    super("The NullWorker")
  end
  def work(job)
    puts "(#{job} is ignored by NullWorker)"
  end
end

class PrintWorker
  include Worker
  def initialize(name)
    super(name)
  end
  def work(job)
    puts "#{self} does \"#{job}\"."
  end
end

class Main
  def Main.main
    worker1 = PrintWorker.new("worker1")
    worker2 = PrintWorker.new("worker2")
    Worker.activeWork("Hello, worker!")
    worker1.activate
    Worker.activeWork("Hello, worker!")
    worker2.activate
    Worker.activeWork("Hello, worker!")
  end
end
Main.main
以下の記述は誤っています。 Monostateはいくつでもインスタンスを作ることが可能です。 そのうち修正します。
MonostateパターンとSingletonパターンとを比較します。
Singletonパターンはインスタンスが1個しかありません。 一方Monostateパターンはインスタンスが1個もありません。 この違いはどういうところに影響するでしょうか。
Monostateなクラスは、インスタンスがないので、 メソッドの引数に渡したり、変数に代入したりすることができません (もちろんClassクラスのインスタンスを渡せば別ですが)。
SingletonThemeとAnotherThemeProviderをまとめるThemeProviderというインタフェースが登場します。 そしてThemePrinter.printThemeにそのインスタンスを 渡してgetThemeを実行しています。 ここではSingletonパターンが使われていますが、 ここにMonostateパターンを使うことはできません (例えばMonostateThemeProviderは作れません)。
class ThemePrinter {
    static void printTheme(ThemeProvider theme) {
        System.out.println(theme.getTheme());
    }
}

interface ThemeProvider {
    public String getTheme();
}

class SingletonTheme implements ThemeProvider {
    private static SingletonTheme singleton = new SingletonTheme();
    private String theme = "classic";
    private SingletonTheme() {
    }
    public String getTheme() {
        return theme;
    }
    public void setTheme(String theme) {
        this.theme = theme;
    }
    public static SingletonTheme getInstance() {
        return singleton;
    }
}

class AnotherThemeProvider implements ThemeProvider {
    private String theme = "mechanic";
    public AnotherThemeProvider(String theme) {
        this.theme = theme;
    }
    public String getTheme() {
        return theme;
    }
}

class Main {
    public static void main(String[] args) {
        ThemePrinter.printTheme(SingletonTheme.getInstance());
        ThemePrinter.printTheme(new AnotherThemeProvider("ancient"));
    }
}
助田です。Rubyだとどうなるかシリーズ。

> 例えば、Monostateなクラスはインスタンスがないので、
> 以下のようにメソッドの引数に渡すことができないと思います。
> (もちろんClassクラスのインスタンスを渡せば…(^_^;)

Rubyでは若干事情が違って、引数として渡すことができます。
この辺が、Javaのような静的な型のある言語とRubyのような
静的な型のない言語の違いですね。

> そしてThemePrinter.printThemeにそのインスタンスを
> 渡してgetThemeを実行しています。
> この枠組みにMonostateなクラスを入れることはできません。
> (例えばMonostateThemeProviderは作れない)

Rubyの場合、ThemePrinter.printThemeの引数は
getThemeというメソッドをもつオブジェクトであれば、何でも
OKということになります。

下の例では、MonostateThemeProviderも、SingletonThemeの
インスタンスもAnotherThemeProviderのインスタンスもgetTheme
メソッドをもっていることがポイントです。

ですが、このような実装は混乱の元になるので、やらない方が
身のためです。^^;;;
MonostateパターンかSingletonパターンのどちらか一方を使うように
統一すべきでしょう。

うーん。でも、こうなってくると Ruby における Monostate と Singleton
の違いって何でしょう???

# ちなみに、[DP/ML 0389]の例でもRubyだとMonostateを
# 使って書けてしまいます。
require 'singleton'

class ThemePrinter
  def ThemePrinter.printTheme(theme)
    puts(theme.getTheme)
  end
end

class MonostateThemeProvider
  @@theme = "monotone"
  def MonostateThemeProvider.getTheme
    @@theme
  end
  def MonostateThemeProvider.setTheme(theme)
    @@theme = theme
  end
  private_class_method :new
end

class SingletonTheme
  include Singleton
  def initialize
    @theme = "classic"
  end
  def getTheme
    @theme
  end
  def setTheme(theme)
    @theme = theme
  end
end

class AnotherThemeProvider
  def initialize(theme)
    @theme = theme
  end
  def getTheme
    @theme
  end
end

class Main
  def Main.main
    ThemePrinter.printTheme(MonostateThemeProvider)
    ThemePrinter.printTheme(SingletonTheme.instance)
    ThemePrinter.printTheme(AnotherThemeProvider.new("ancient"))
  end
end

Main.main
StrategyパターンのConcreteStrategy役を Singletonパターンを使って実装した例を示します。 Javaでは、これをMonostateパターンを使って実装することはできません (本稿は大山晴信さんからのメールをきっかけとして書きました)。
interface Strategy {
    public void execute();
}

class FooStrategy implements Strategy {
    private static Strategy strategy = new FooStrategy();
    private FooStrategy() { }
    public static Strategy getInstance() { return strategy; }
    public void execute() { System.out.println("Foo, Foo, Foo"); }
}

class BaaStrategy implements Strategy {
    private static Strategy strategy = new BaaStrategy();
    private BaaStrategy() { }
    public static Strategy getInstance() { return strategy; }
    public void execute() { System.out.println("Baa, Baa, Baa"); }
}

class Sample {
    private Strategy strategy;
    public Sample(Strategy strategy) {
        this.strategy = strategy;
    }
    public void perform() {
        strategy.execute();
    }
    public static void main(String[] args) {
        Sample[] arr = {
            new Sample(FooStrategy.getInstance()),
            new Sample(BaaStrategy.getInstance()),
        };
        for (int i = 0; i < arr.length; i++) {
            arr[i].perform();
        }
    }
}
助田です。

> こういうのをMonostateでは書けないことになります。

Ruby だと Monostateで書けてしまうという例です。
Monostateには、moduleを利用しています。
module FooStrategy
  def FooStrategy.execute
    puts ("Foo, Foo, Foo")
  end
end

module BaaStrategy
  def BaaStrategy.execute
    puts ("Baa, Baa, Baa")
  end
end

class Sample
  def initialize(strategy)
    @strategy = strategy
  end
  def perform
    @strategy.execute
  end
  def Sample.main
    ary = [Sample.new(FooStrategy), Sample.new(BaaStrategy)]
    ary.each do |strategy|
      strategy.perform
    end
  end
end

Sample.main
さらにシンプルに Sample クラスは
class Sample
  def Sample.main
    ary = [FooStrategy, BaaStrategy]
    ary.each do |strategy|
      strategy.execute
    end
  end
end
と書くことができます。

  # proc 使えば module も必要なくなるかも。
  助田 雅紀
あなたのご意見・感想をお送りください。 あなたの一言が大きなはげみとなりますので、どんなことでもどうぞ。